- $USD
- English (United States)
- Hire an Expert
- Get Support
Speed at the checkout matters for your customers, and you want to know why?
Here is the reason why:
If your customers have to type out their full address every time they place an order, they may make typing mistakes in a hurry, i.e., wrong zip code, which will lead the store owner to further frustration. Chances are, some of them won’t stick around. Long forms lead to frustration, and frustration leads to cart abandonment.
This is where address autocomplete WooCommerce comes in. It helps your store suggest full addresses as customers start typing.
The best part? It uses Google’s API to fill in street, city, and postal code instantly.
In this guide, we’ll show you how to set up Google address autocomplete for WooCommerce using simple steps. Whether you're using a plugin or writing code yourself, you’ll have everything you need to improve your checkout process and make things easier for your shoppers.
If you’re running a WooCommerce store and want to cut down checkout complexity and abandoned cart rates, this guide is for you. Using the address autocomplete WooCommerce plugin gives shoppers a faster, stress-free checkout experience.
What Are Google Address Suggestions and How Do They Work at Checkout?
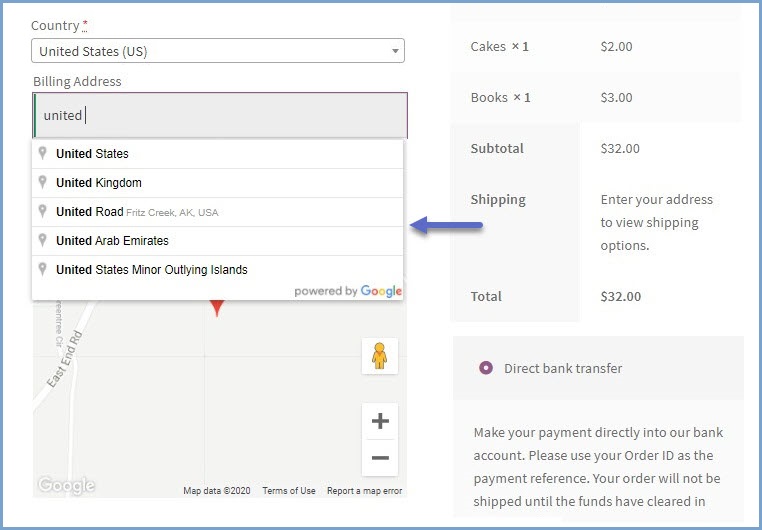
Google address suggestions use the API to predict and fill in address fields. As soon as a customer starts typing, a dropdown appears with location matches. When they pick one, your form fills in city, state, and postal code automatically.
Overview of Address Suggestions
Address suggestions appear as soon as a customer starts typing their location at checkout. Google’s API scans for real addresses and shows a dropdown with matching options. One click, and the form fills in key details like street, city, state, and ZIP code.
But there’s more than just typing. With the WooCommerce Google address autocomplete feature, customers can also use a map. They simply drag the pin to their location, and Google pulls the full address. No manual typing.
This means the form fills automatically from country to ZIP code, all powered by Google autofill customer addresses. It's faster, easier, and great for mobile users, especially with WooCommerce address autocomplete Android compatibility, and other mobile layout compatibility.
This isn't just about saving time. It's about giving your customers the easiest path to complete their purchase without errors or frustration.
You can also find the WooCommerce address autocomplete plugin on the official WooCommerce Marketplace.
Why Add Google Address Suggestions to Your WooCommerce Store?
Faster Checkout
No more typing out every detail. Address autocomplete WooCommerce slashes form time.
More Accurate Addresses
Fewer typos mean fewer failed deliveries. Google’s data is kept up to date.
Happier Customers
A quick, smooth checkout feels like VIP service.
Fewer Abandoned Carts
Long forms frustrate buyers. Autocomplete keeps them moving forward.
Works Worldwide
Google supports millions of places. You’re covered whether you ship locally or globally.
Ways to Add Google Address Suggestions to WooCommerce
Option 1: By Opting For An Address Autocomplete Plugin
The easiest path is a WooCommerce address autocomplete plugin. It bundles all the settings in one place. Most let you enable Google autofill customer addresses with a switch.
A plugin handles all the heavy lifting for you. It even manages updates so you always have the latest features and security patches. If you ever need to revert or try a different look, you can deactivate or switch plugins in a few clicks.
Option 2: Add Custom Code
If you prefer full control, you can hook into WooCommerce checkout fields and call the Google Maps JavaScript API yourself. This method requires coding skills and managing API quotas manually. Here’s what it involves:
1. Load Google’s Scripts
- In your theme’s functions.php or a custom plugin, enqueue the Google Maps JavaScript API with your key.
- Make sure to request the Places API library.
2. Hook Into Checkout Fields
- Use WooCommerce hooks like woocommerce_checkout_fields to modify the billing and shipping inputs.
- Add id or class attributes that your JavaScript can target.
3. Write JavaScript for Autocomplete
- Initialize a new google.maps.places.Autocomplete object on your address fields.
- Listen for the place_changed event. When it fires, extract the address_components (street, city, state, ZIP, country) and fill your form fields.
4. Handle Map Interaction
- If you want a draggable marker feature, embed a small Google Map next to your fields.
- Tie the map’s dragend event to reverse geocoding calls so you can fill the fields when customers move the pin.
5. Manage API Quotas
- Monitor your usage in the Google Cloud Console.
- Set up billing alerts so you don’t exceed free-tier limits.
6. Maintain and Update
- Since this is custom code, you’re responsible for updates.
- When WooCommerce or the Google API changes, you may need to tweak your scripts.
Custom coding takes more work, but you can craft a unique user experience that matches your store’s style exactly.
Compatibility Check
Before you enable address autocomplete WooCommerce, make sure your site meets these requirements:
- WooCommerce Version: You need WooCommerce 4.x or newer.
- PHP Version: Your server should run PHP 7.4 or higher (PHP 8+ recommended).
- Theme Support: Works with most themes, including Storefront, Flatsome, Avada, Porto, Woodmart, Divi, and the default WooCommerce theme.
- HPOS Ready: Fully compatible with WooCommerce High-Performance Order Storage (HPOS) for faster order handling.
- Multisite Friendly: You can activate and configure it across a WordPress multisite network.
Step-by-Step Guide to Adding Google Address Suggestions
Step 1: Install and Activate WooCommerce Address Autocomplete
- Go to Plugins > Add New in your dashboard.
- Search for “Google Address Autocomplete for WooCommerce.”
- Click Install Now, then Activate.
Step 2: Get a Google Maps API Key
- Visit the Google Cloud Console.
- Create a new project, then go to APIs & Services.
- Click + Create Credentials, choose API Key.
- Enable Places API, Maps JavaScript API, and Geocoding API.
- Copy the API key.
Step 3: Configure Your Checkout Page
- In WordPress, open WooCommerce > Settings > Google Address Autocomplete.
- Paste your API key into the field.
- Toggle on Enable Address Autocomplete for billing and shipping.
- Select Map Design through 5 different layouts.
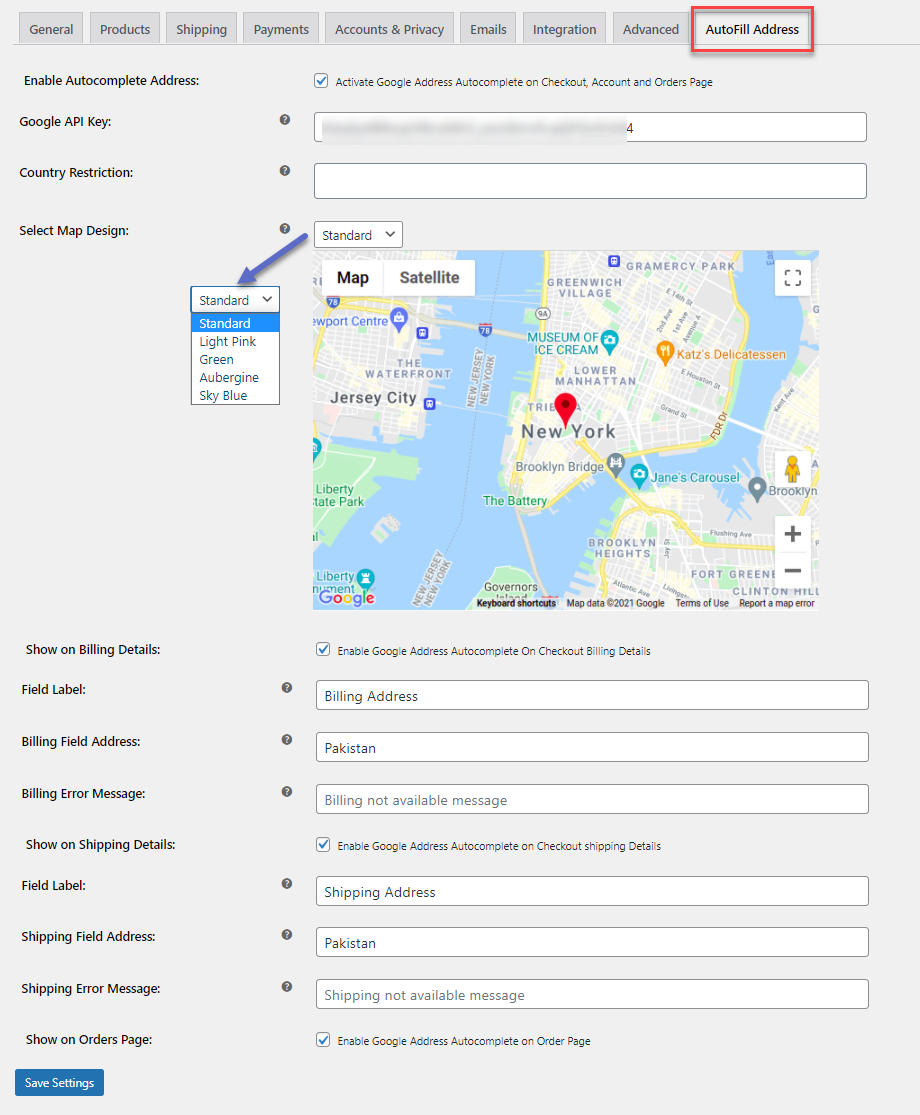
Step 4: Turn On Address Suggestions
- Choose which fields show suggestions (street, city, postal code).
- Set error messages for restricted countries, if needed.
- Save changes.
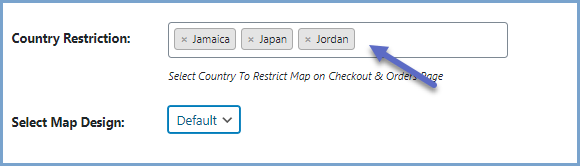
Step 5: (Optional) Limit Suggestions by Country
- In the same settings tab, find Country Restriction.
- Select one or more countries to enable autocomplete.
- Save to hide suggestions elsewhere.
Step 6: Publish and Test the Checkout
- Visit your checkout page.
- Start typing an address and watch suggestions show up instantly.
- Try dragging the map pin—your form fields should fill in automatically
Support and Resources
- Plugin Documentation: Detailed setup and troubleshooting steps are available on the official guide: WooCommerce Google Address Autocomplete.
- Community Forums: Find answers or ask questions on the WooCommerce support boards and Stack Overflow.
- Video Walkthrough:
Six Tips for Using WooCommerce Address Autocomplete Plugin Effectively
1. Secure and Monitor Your API Key
The address autocomplete WooCommerce plugin relies on a Google Maps API key. Keep this key safe and set usage alerts in the Google Cloud Console. That way, you’ll know if your Google address autocomplete for WooCommerce calls spikes.
2. Fine-Tune Country Restrictions
Most WooCommerce address autocomplete plugin settings let you limit suggestions by country. If you only ship domestically, block other regions. This speeds up results in your autocomplete address and location picker for WooCommerce and keeps dropdowns relevant.
3. Customize Map Styles and Labels
Pick map layouts that match your site’s look and change field labels to guide customers. Clear labels like “Street Address” help shoppers use the WooCommerce Google address autocomplete feature without confusion. A branded map style also reinforces your store’s identity.
4. Test on All Devices
Don’t forget to try WooCommerce address autocomplete on Android phones and tablets. Also check desktop browsers. Look for layout breaks, slow dropdowns, or map-pin glitches. Fixing these early keeps your Google autofill customer addresses feature smooth everywhere.
5. Offer a Backup Input Method
Even with great suggestions, some users prefer typing. Always include a plain text field alongside your autocomplete widget. This manual override ensures no one is locked out if API calls fail or if they want to enter an unusual address.
6. Track Performance and Feedback
Use site analytics to see if your address autocomplete WooCommerce tool is cutting form time and lowering cart abandonment. Survey a few customers—ask how they like the WooCommerce address autocomplete plugin. Regular feedback lets you tweak settings for the best results.
Conclusion
By adding the address autocomplete WooCommerce feature, you turn a slow form into a smart helper. Shoppers type a few letters and see a dropdown of real addresses.
The WooCommerce address autocomplete plugin auto-fetches street, city, state, and ZIP. That cuts typos and failed deliveries.
Whether you pick a plugin or custom code, you’ll speed up your checkout. Faster checkouts boost sales and keep customers coming back.
FAQs
1. Can I add address autofill to any WooCommerce site?
Absolutely! You can enable WooCommerce address autocomplete on any WooCommerce store. The simplest way is by using a plugin like FunnelKit or any reliable autocomplete address and location picker for WooCommerce. Just install it, add your Google Maps API key, and you're good to go.
2. Will I be charged for a Google Maps API key?
Not unless your store has high traffic. Google offers $200 worth of free credit every month for its APIs, which is more than enough for most small and medium stores using Google address autocomplete for WooCommerce. If you go over the limit, Google will charge based on usage. You can always check your billing settings to avoid surprises.
3. What’s the easiest way to autofill addresses in WooCommerce?
The easiest way? Use a WooCommerce address autocomplete plugin. It connects your checkout form with Google Maps and autofills addresses after a few keystrokes. You don’t need to write a single line of code. Just plug it in, paste your API key, and watch the magic happen.
4. How do I turn on Google autocomplete for both billing and shipping fields?
Most plugins that support Google address autocomplete for WooCommerce let you enable it for both billing and shipping addresses. In FunnelKit, for example, just go into the plugin settings and enable autocomplete on both sections. Easy and fast.
5. What should I check if my API key isn’t working?
If your Google Maps API key isn’t doing its job, here’s a quick checklist:
- Make sure you’ve enabled Places API, Maps JavaScript API, and Geocoding API.
- Double-check any domain restrictions on the key.
- Confirm that billing is enabled in your Google Cloud account.
If all else fails, try generating a new API key.
6. Why aren’t any address suggestions appearing?
No suggestions? Here’s what might be going wrong:
- Your API key may be restricted or missing required permissions.
- There could be JavaScript errors on the checkout page.
- Another plugin may be clashing with the WooCommerce Google address autocomplete.
Use browser developer tools to spot errors or try disabling conflicting plugins temporarily.
7. How do I limit autocomplete to certain countries?
Want to keep things local? Most plugins let you restrict Google address autocomplete to one or more countries. Just go into the plugin settings and enter the country codes where you want suggestions to appear. This speeds things up for local buyers.
8. How can I stop caching or minification plugins from breaking autocomplete?
Some caching or JavaScript optimization plugins can mess with WooCommerce address autocomplete features. To fix it:
- Exclude the checkout page from caching.
- Disable JavaScript minification on that page.
This keeps Google’s script working properly during checkout.
9. Will autocomplete work on a multi-step checkout?
Yes! Whether you’re using a one-page or multi-step checkout, most modern plugins — like FunnelKit, support Google autofill customer addresses across all steps. Just make sure the plugin you choose works with your layout.
10. Is there a way to let users enter their address manually instead of using suggestions?
Definitely, even with an autocomplete address and location picker for WooCommerce, users can still type their address manually. Most plugins are designed with flexibility in mind. Autocomplete is just a convenience — not a requirement.
11. What happens if the Google Places API goes offline?
If Google’s API ever goes down (rare, but possible), your checkout form will still work — it just won’t offer suggestions. Customers can still enter their address the traditional way. This is why having the manual entry option available is always a smart move.